In this article, we discuss how to create a User-Defined Format in SAS. You will learn how to create your own formats from scratch and how to create formats based on an existing data set. All concepts will be supported by SAS code and examples.
If you want to know more about how to format variables in a SAS dataset, we recommend this article.
Contents
Create a User-Defined Format
Types of Formats
You use SAS formats to map one value into another. Although SAS provides a wide variety of predefined formats, you can also create your own, user-defined format in SAS. You can use your formats to map:
- a numeric value into a character string
- a character string into a numeric value
- a character string into another character string
Efficiency of User-Defined Formats
The result of applying a SAS format to map one value into another is the same as writing out the mapping in an IF-ELSE-THEN statement. Even so, you could use a SAS merge or SQL join to carry out a mapping. However, a SAS format is more efficient, both in coding and execution time, than an IF-ELSE-THEN statement and a merge/join.
PROC FORMAT
You can use the PROC FORMAT procedure to create your used-defined formats. The syntax of this procedure is straightforward:
proc format;
	value format_name
		original_value_1 = new_value_1
		original_value_2 = new_value_2
		...
		original_value_n = new_value_n
		;
run;
First, you write the value or invalue statement and the name of your format. User-Defined Formats can be 32 characters long, should start with an English letter or an underscore (_), and can’t end with a number.
You use the value statement to map numeric values a character string. On the contrary, you use the invalue statement to map a character string to a numeric value.
After you have defined the name of the format, you list the mapping specification(s), i.e., the original value(s) followed by an =-sign and the new value.
Numeric Formats
In this section of the article, we show 3 examples of numeric used-defined formats. Remember, to define a numeric format you use the value statement.
Example 1: Mapping a Single Value & a Lists of Values
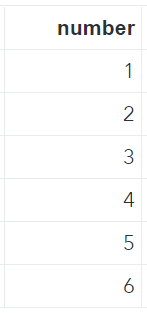
In our first example, we demonstrate how to create a user-defined format that maps single values (e.g. 1) and lists of values (e.g. 2, 3, and 4). Suppose we have a data set with the numbers one to six (see below). We want to map the numbers 2, 3, and 5 to “Prime”, as well as, 4 and 6 to “Not-Prime”. By convention, the number 1 is neither prime nor composite (i.e., not-prime) and hence we want to map this number to “Not Applicable”.
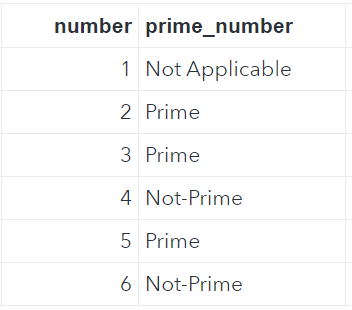
With the PROC FORMAT procedure, we define the name of our numeric (“prime_fmt”) followed by 3 mapping specifications. First, we use a mapping of a single value, namely 1 = “Not Applicable”. Then, we use twice a mapping of a list of values, that is 2, 3, 5 = “Prime” and 4, 6 = “Not-Prime”.
data work.ds_numbers;
	input number;
	datalines;
1
2
3
4
5
6
;
run;

proc format;
	value prime_fmt
		1 = "Not Applicable"
		2, 3, 5 = "Prime"
		4, 6 = "Not-Prime";
run;

data work.ds_prime_numbers;
	set work.ds_numbers;

	prime_number = put(number, prime_fmt.);
run;
Once we have created the “prime_fmt” format, we create a new data set. With the put function we create a new column “prime_number” containing the mapped values. Note that we could also have used a format statement to apply the format directly. However, this would have overwritten and changed the type of the “number” column.
Example 2: Mapping a Range of Values & Out of Range Values
In the second example of numeric user-defined formats, we demonstrate how to map a range of values and define a default mapping for not-mapped values.
Suppose we have a SAS data set with student names and their scores on an exam (see the data set below).
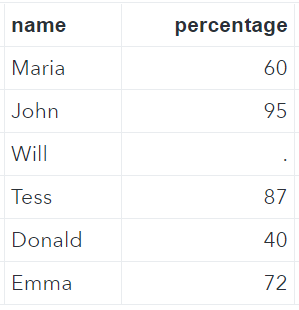
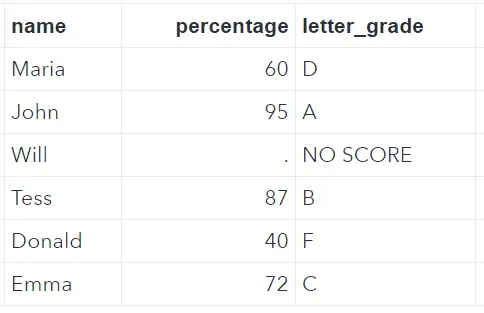
We would like to assign each student a grade depending on their score. If the score ranges between 90 and 100 (both inclusive), then the student’s grade is an “A”. If the score ranges between 80 and 89 (both inclusive), then its grade is a “B”, etc. Ultimately, scores between 0 and 59 are assigned an “F”. If the student didn’t show up for the exam or the exam is invalid, i.e. a test score that isn’t mapped, then the grade will be “No Score”.
data work.ds_testgrades;
	infile datalines dlm=',';
	input name $ percentage;
	datalines;
Maria, 60
John, 95
Will, .
Tess, 87
Donald, 40
Emma, 72
;
run;

proc format;
	value percentage_fmt
		0 - 59 = "F"
		60 - 69 = "D"
		70 - 79 = "C"
		80 - 89 = "B"
		90 - 100 = "A"
		other = "NO SCORE";
run;

data work.ds_testgrades_fmt;
	set work.ds_testgrades;

	letter_grade = put(percentage, percentage_fmt.);
run;
Again, we use the value statement to define the name of the format (“percentage_fmt”) first. Then, we use 5 ranges of values to map a test score to a grade. With the special keyword other we define out of range values, in this case, “No Score”.
Once more, we use the put function to create a new column (“letter_grade”) with the mapped value.
Example 3: Mapping an Exclusive Range of Values & Extreme Values
To conclude the section on numeric user defined formats, we show how to create mapping specifications with exclusive ranges and extreme values.
For example, 0-<100 is an exclusive range. All values from 0 to 100 are included, except for 100.
With the special keywords low and high, you can specify minus infinity and plus infinity. For example, you could use the high keyword to define that all values from 100 onwards should be considered as good (100-high = “Good”).
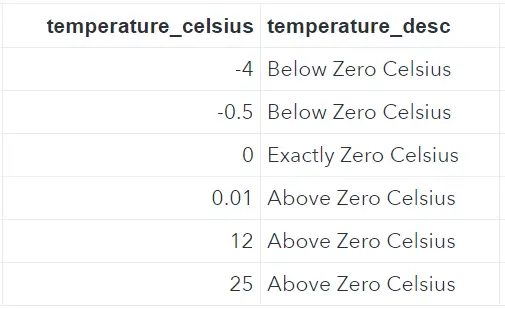
In the example below, we create a format that maps all negative temperatures as “Below Zero Celsius”, all positive temperatures as “Above Zero Celsius”, and zero celsius as “Exactly Zero Celsius”. To do this we need to combine exclusive ranges with the keywords low and high for extreme values.
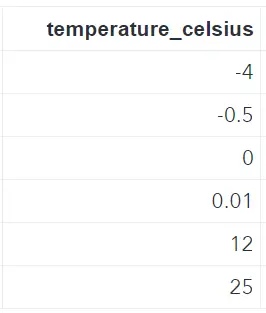
data work.ds_temperature;
	input temperature_celsius;
	datalines;
-4
-0.5
0
0.01
12
25
;
run;

proc format;
	value temperature_fmt
		low -< 0 = "Below Zero Celsius"
		0 = "Exactly Zero Celsius"
		0 <- high = "Above Zero Celsius";
run;

data work.ds_temperature_fmt;
	set work.ds_temperature;

	temperature_desc = put(temperature_celsius, temperature_fmt.);
run;
In the table below, we summarize all the possible mapping specifications discussed above for user-defined numeric formats.
| Type | Example |
|---|---|
| Single Value | 1 = “Monday” |
| List of Values | 2, 4, 6 = “Even” |
| Range of Values | 0-19 = “Adolescent” |
| Exclusive Range of Values (I) | 1 -< 100 = “Below 100” |
| Exclusive Range of Values (II) | 100 >- 999 = “Above 100” |
| Extreme Values (I) | low – 0 = “Not positive” |
| Extreme Values (II) | 0 – high = “Not Negative” |
| Out of Ranges | other = “Not Mapped” |
Character Formats
In SAS, you can create a User-Defined character format for:
- Map a character string to a numeric value, or
- Map a character string to another character string.
When you map a character string to a numeric value, you need to use the invalue statement. For a character to character mapping, you use the value statement.
Character to Numeric Mapping
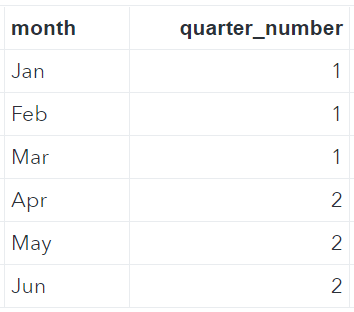
Suppose we have a SAS data set with the abbreviation of the months (see below) and we want to map each abbreviation to the number 1, 2, 3, etc.
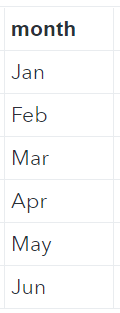
First, we use the invalue statement to define a character to numeric mapping. Then we detail the mapping specification. Keep in mind that SAS format is case sensitive, i.e., the first mapping specification works only for “Jan” and not for “jan” nor “JAN”.
data work.ds_months;
	input month $;
	datalines;
Jan
Feb
Mar
Apr
May
Jun
;
run;

proc format;
	invalue month_fmt
		"Jan" = 1
		"Feb" = 2
		"Mar" = 3
		"Apr" = 4
		"May" = 5
		"Jun" = 6;
run;

data work.ds_months_fmt;
	set work.ds_months;

	month_number = input(month, month_fmt.);
run;
After we have declared the format, we create a new data set with the column “month_number”. We use the input function to apply our user defined format.
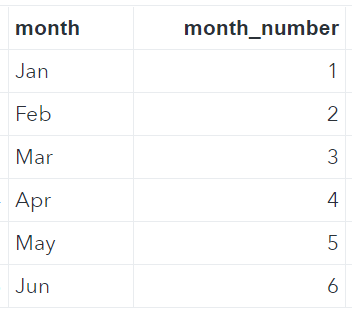
In the example above, we specified a distinct mapping for each month. However, you can also create mapping specifications that apply the same mapping to different months. For example, with the SAS code below, we map the character strings “Jan”, “Feb”, and “Mar” to 1 and “Apr”, “May”, and “Jun” to 2 (quarters).
data work.ds_months;
	input month $;
	datalines;
Jan
Feb
Mar
Apr
May
Jun
;
run;

proc format;
	invalue quarter_fmt
		"Jan", "Feb", "Mar" = 1
		"Apr", "May", "Jun" = 2;
run;

data work.ds_quarter_fmt;
	set work.ds_months;

	quarter_number = input(month, quarter_fmt.);
run;
Character to Character Mapping
You can also create a User-Defined Format in SAS to map a character string into another character string. In such a format you use the value statement and a format name that starts with a dollar sign ($).
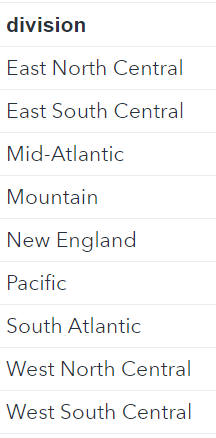
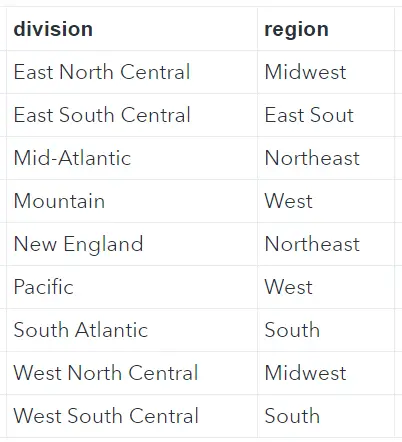
In the example below, we use a User-Defined Format to map the 9 Census Bureau divisions into the 4 Census Bureau regions (Northeast, Midwest, South, and West). First, we create a SAS dataset with the datalines statement and the truncover option. Then, we define the “$division_fmt” format where each mapping specification is a list of values, i.e., a list of divisions. Finally, we create a new SAS dataset and use a combination of the put function and the “$division_fmt” format to create the column Region.
data work.division;
	infile datalines truncover;
	input division $25.;
	datalines;
East North Central
East South Central
Mid-Atlantic
Mountain
New England
Pacific
South Atlantic
West North Central
West South Central
;
run;

proc format;
	value $division_fmt
		"New England", "Mid-Atlantic" = "Northeast"
		"East North Central", "West North Central" = "Midwest"
		"South Atlantic", "East South Central", "West South Central" = "South"
		"Mountain", "Pacific" = "West";
run;

data work.division_region;
	set work.division;

	region = put(division, $division_fmt.);
run;
Create a User-Defined Format from Data
Instead of writing out all the mapping specifications in the PROC FORMAT procedure, you can build a User-Defined Format directly from a SAS dataset. Below we explain how.
The dataset that contains the mapping specifications contains 3 columns, namely fmtname, start, and label. The fmtname column contains the name of your desired format while the start and label columns contain the left and right side of the mapping specification. Once you have created this dataset, you need to sort it by the start column. Finally, you use the cntlin option of the PROC FORMAT procedure to use this data set as the User-Defined Format.
data work.data_for_format;
	set sashelp.gcstate;

	retain fmtname "$state_fmt";
	start = MapIDName;
	label = MapIDNameAbrv;

	keep fmtname start label;
run;

proc sort data=work.data_for_format;
	by start;
run;

proc format cntlin=work.data_for_format;
run;
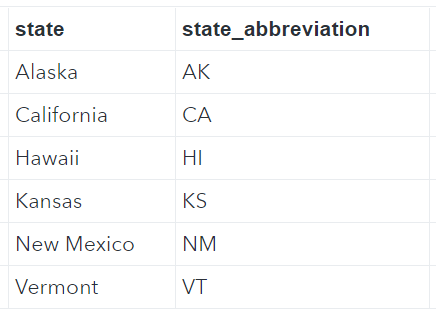
In the example above, we created a format that can be used to State Names to State Abbreviations. Below we put this format into practice.

data work.states;
	infile datalines truncover;
	input state $25.;
	datalines;
Alaska
California
Hawaii
Kansas
New Mexico
Vermont
;
run;

data work.states_abrv;
	set work.states;

	state_abbreviation = put(state, $state_fmt.);
run;

2 thoughts on “Learn How to Create a User-Defined Format in SAS”
Comments are closed.