This article discusses 3 ways to import a Comma Separated Values (CSV) file into SAS. The 3 ways are the PROC IMPORT procedure, the SAS DATA Step in combination with the INFILE statement, and the Import Wizard.
We support all methods with images and SAS code.
Contents
Sample Data
Throughout this article, we will use the SHOES dataset from the SASHELP library to demonstrate how to import a CSV file. In a previous article, we explained how to export a SAS dataset as a CSV file. Now, we want to import this same file.
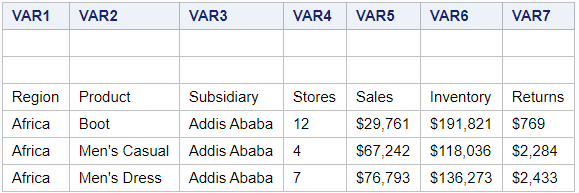
The file we want to import contains information about shoe sales. It has 7 columns and 396 rows (including the header). The file has character and numeric columns.
In this article, we will import 3 different CSV files. You can download these files here to replicate the examples.


Make sure that you change the path “/folders/myfolders/import/” to the path we you have saved these CSV files.
Do you know? How to Export a SAS Dataset as CSV, Excel, or TXT file
Import a CSV File into SAS with PROC IMPORT
The first and easiest way to import a CSV file into SAS is with the PROC IMPORT procedure. PROC IMPORT imports an external data file to a SAS data set. You can use this procedure to import different files, such as CSV, EXCEL, and TXT.
How to Import a CSV File with PROC IMPORT
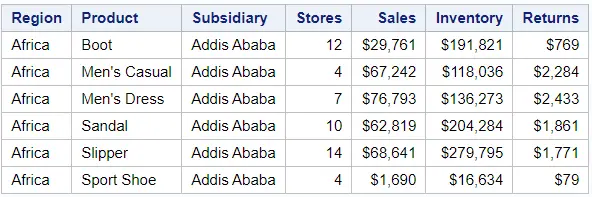
In this section, we demonstrate how to import the “shoes.csv” file.
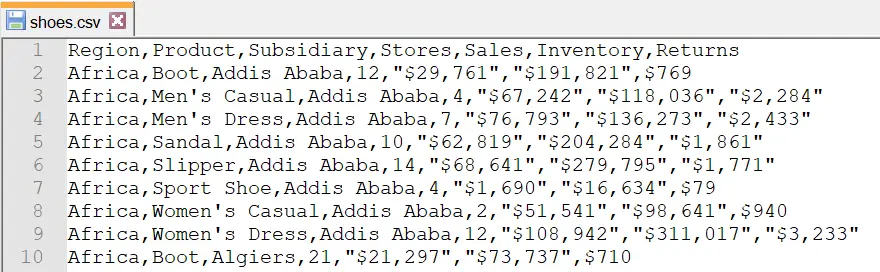
The first row of this file contains the header and the values are separated by commas. If one of the values contains a comma, then the value is enclosed between double-quotes.
Here is how to import a CSV file into SAS with PROC IMPORT
1. Define the location, file name and file extension
The first argument of the PROC IMPORT procedure is the FILE=-argument. This argument specifies the location, file name, and file extension of the CSV file. This information must be enclosed in double-quotes.
2. Specify the SAS output dataset
The second argument of the PROC IMPORT procedure is the OUT=-argument. This argument identifies the name of the SAS output dataset.
3. Specify the type of data to import
The third argument of the PROC IMPORT procedure is the DBMS=-argument. DBMS stands for Database Management Systems and specifies the file type of data to import. For example, CSV, XLSX, or TXT.
The code below shows how to import the shoes.csv file and create the SAS dataset work.shoes with PROC IMPORT.
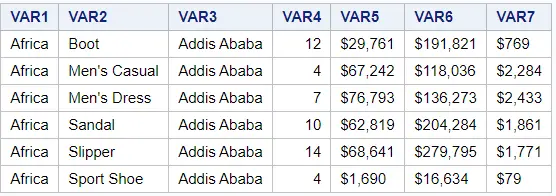
proc import file="/folders/myfolders/import/shoes.csv"
    out=work.shoes
    dbms=csv;
run;

proc print data=work.shoes (obs=6) noobs;
run;
If you run the code above, SAS writes a note to the log that it has successfully imported the file. It show the number of observations and the number of variables.

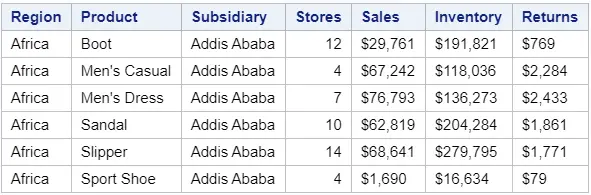
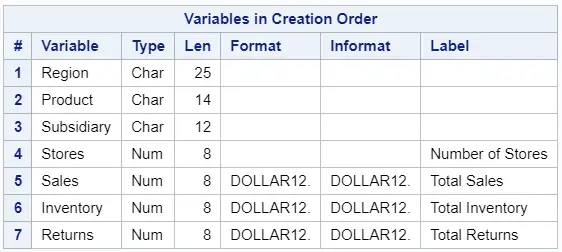
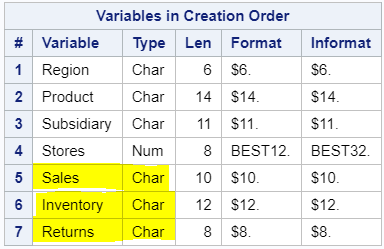
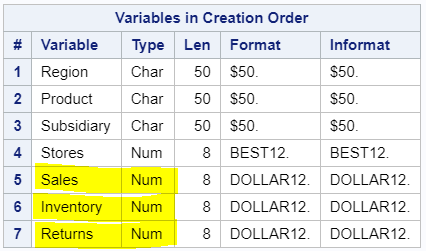
Although not directly clear, the PROC IMPORT procedure interpreted the Sales Inventory, and Returns variables as character instead of numeric variables. You can see this more clearly when you run the PROC CONTENTS procedure.
proc contents data=work.shoes order=varnum;
run;
An advantage of the PROC IMPORT procedure is its simplicity; you need only a few files of code to import a file. However, a drawback is its lack of flexibility. For example, you can’t specify the data type (numeric or character) of the variables. You would need an extra step to convert them.
If you need this flexibility, check how to import a CSV file with the SAS DATA Step and the INFILE statement.
How to Replace an Existing File
By default, the PROC IMPORT procedure doesn’t overwrite existing datasets. For example, if you re-run the code above, SAS writes a note to the log that it cancelled the import.
proc import file="/folders/myfolders/import/shoes.csv"
    out=work.shoes
    dbms=csv;
run;

So, how can you overwrite an existing SAS dataset while importing a CSV file? You can add the REPLACE option to the PROC IMPORT procedure to overwrite a SAS dataset.
The REPLACE option must be placed after the DBMS=-argument.
proc import file="/folders/myfolders/import/shoes.csv"
    out=work.shoes
    dbms=csv
    replace;
run;
How to Change the Default Delimiter
In general, CSV files use a comma to separate values. However, in some cases, the values in a CSV file are separated by another symbol. Nevertheless, the PROC IMPORT procedure assumes that the comma is the delimiter of a CSV file. So, how do you change the delimiter in PROC IMPORT?
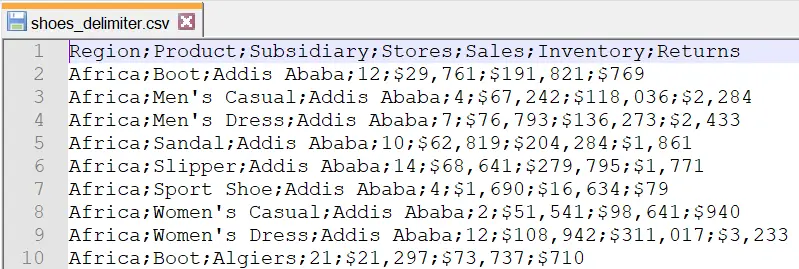
The shoes_delimiter.csv file is a CSV file where the values are separated by a semicolon.
To change the default delimiter of the PROC IMPORT procedure, you need:
- Set the DBMS=-argument to dlm.
- Use the DELIMITER=-option and specify the symbol that separates the values in your file.
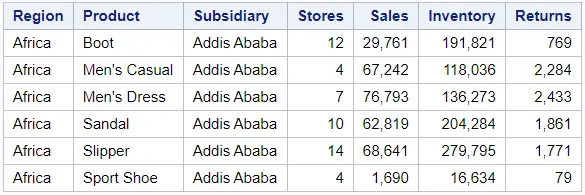
proc import file="/folders/myfolders/import/shoes_delimiter.csv"
    out=work.shoes
    dbms=dlm
    replace;
    delimiter=";";
run;

proc print data=work.shoes (obs=6) noobs;
run;
How to Import a CSV File without Header
The PROC IMPORT procedure expects that the first row of your file contains a header. But, how do you import a CSV file without a header into SAS?
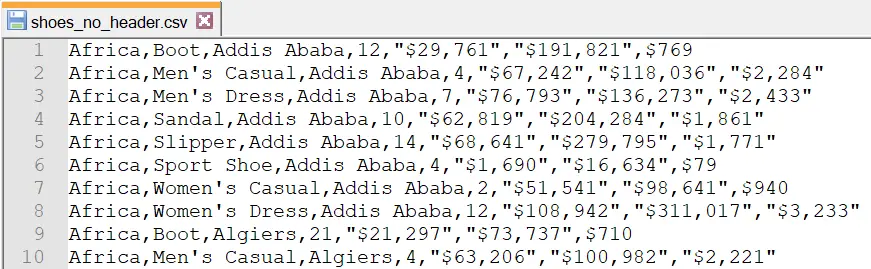
The file shoes_no_header.csv contains the data of the SHOES dataset from the SASHELP library, but without header.
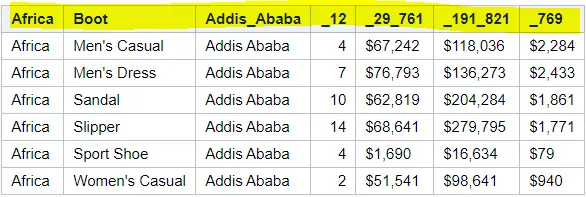
If you would use the standard code to import this file, SAS assumes that the first row contains the header. However, since this CSV doesn’t have a header, the column names of the output dataset would be incorrect.
proc import file="/folders/myfolders/import/shoes_no_header.csv"
    out=work.shoes
    dbms=csv
    replace;
run;

proc print data=work.shoes (obs=6) noobs;
run;
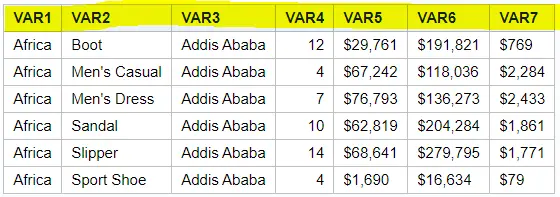
To import a CSV file without a header, you need the GETNAMES=-option. This option lets the PROC IMPORT procedure know that the CSV file has column names or not.
By default, the value of the GETNAMES=-option is YES. However, if the import file doesn’t have a header, you need to use GETNAMES=NO.
The code below shows how to use the GETNAMES=-option.
proc import file="/folders/myfolders/import/shoes_no_header.csv"
    out=work.shoes
    dbms=csv
    replace;
    getnames=no;
run;

proc print data=work.shoes (obs=6) noobs;
run;
If you use the GETNAMES=NO option, then SAS sets the variables names to VAR1, VAR2, etc.
If you want to import a CSV file and specify the variable names, type, and format, you can use a SAS DATA Step and the INFILE statement.
Do you know? How to Rename Variable Names
How to Change the Starting Row when Importing a CSV File
Normally, the first row of a file contains data. But, how do you import a CSV file where the data starts at another row?
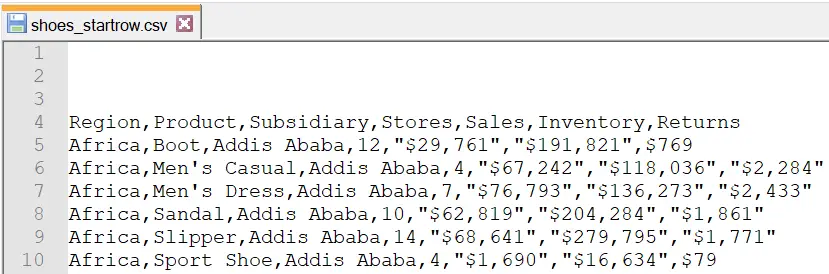
The shoes_startrow.csv file contains the data of the SHOES dataset from the SASHELP library. In contrast to previous examples, the data starts at row 5.
If you would run the standard code of the PROC IMPORT procedure, SAS creates a dataset where the first rows are completely blank.
proc import file="/folders/myfolders/import/shoes_startrow.csv"
    out=work.shoes
    dbms=csv
    replace;
run;

proc print data=work.shoes (obs=6) noobs;
run;
You can use the DATAROW=-option to start the import of a CSV file from a specified row. If you use this option, the GETNAMES=-option won’t work. The GETNAMES=-option only works if the variable names are in the first row.
proc import file="/folders/myfolders/import/shoes_startrow.csv"
    out=work.shoes
    dbms=csv
    replace;
    datarow=5;
run;

proc print data=work.shoes (obs=6) noobs;
run;
Do you know? How to Rename Column Names
How to Guess the Data Type of a Variable
The last option of the PROC IMPORT procedure we discuss is the GUESSINGROWS=-option.
Because PROC IMPORT doesn’t let you specify the data type of the variables in your CSV file, it makes a guess about it. By default, PROC IMPORT takes the first 20 rows into account to determine the type of each column (numeric or character).
However, if the first 20 rows are empty or can be interpreted as both numeric and character, then this guess might be wrong. So, to increment the number of rows that SAS takes into account to guess the data type you can use the GUESSINGROWS=-option. You can specify the number of rows or set it to MAX (2147483647 rows).
proc import file="/folders/myfolders/import/shoes.csv"
    out=work.shoes
    dbms=csv
    replace;
    guessingrows=50;
run;
Import a CSV File into SAS with a DATA STEP
The second method to import a CSV file into SAS is a DATA Step. Although this method requires more lines of code than the PROC IMPORT procedure, it provides you with more flexibility. Especially regarding the variable names, types, and lengths.
How to Import a CSV File with a DATA STEP
In this example, we will import the shoes.csv file.
Here is how to import a CSV file into SAS with a DATA STEP:
1. Specify the output dataset
The first step to import a CSV file with a DATA STEP is to specify the location (i.e., library) and name of the output dataset.
2. Define the file location, file name, and file extension of the CSV file
The second step is to specify the location, name, and extension of the CSV file you want to import. You do this with the INFILE statement.
3. Specify the INFILE options
The INFILE statement has several options.
The delimiter option specifies the symbol that separates the values in the CSV file. Normally, this is a comma, but it can be different. The delimiter most be enclosed in double quotes.
The missover option tells SAS to continue reading the CSV file when it encounters a missing value. That is to say when it encounters two consecutive delimiters.
The dsd option let SAS know to ignore delimiters that are enclosed between double quotes. For example, “$15,500”.
The firstobs option specifies the first row with data. The DATA Step doesn’t recognize headers. So, if the first row of your CSV file contains the header, then you must set the FIRSTOBS=-option to 2.
4. Define the formats of the variables in the CSV file
The fourth step is to define the name and formats of the variables in the CSV file with the INFORMAT statement. The INFORMAT statement let SAS know how to interpret the values.
5. Define the formats of the variables in the output dataset
The last step is to define the name and formats of the variables in the output dataset with the FORMAT statement. In general, the INFORMAT and FORMAT statements are similar.
data work.shoes;
    infile "/folders/myfolders/import/shoes.csv"
	delimiter = ","
	missover
	dsd
	firstobs=2;

	informat Region $50.;
	informat Product $50.;
	informat Subsidiary $50.;
	informat Stores best12.;
	informat Sales dollar12.;
	informat Inventory dollar12.;
	informat Returns dollar12.;

	format Region $50.;
	format Product $50.;
	format Subsidiary $50.;
	format Stores best12.;
	format Sales dollar12.;
	format Inventory dollar12.;
	format Returns dollar12.;

	input
	Region $
        Product $
	Subsidiary $
	Stores
	Sales
	Inventory
	Returns;
run;

proc print data=work.shoes (obs=6) noobs;
run;

As discussed above, this method to import a CSV file gives your more flexibility. For example, in contrast to PROC IMPORT you can specify the variables names and types.
proc contents data=work.shoes order=varnum;
run;
Import a CSV File into SAS Studio / University Edition
The third method to import a CSV into SAS is with the Import Wizard in SAS Studio / SAS University Edition. The Import Wizard is an easy point-and-click method to import external files. However, it doesn’t provide much flexibility.
How to Import a CSV File with a the Improt Wizard
Here is how to import a CSV file info SAS with the Import Wizard in SAS Studio / SAS University Edition
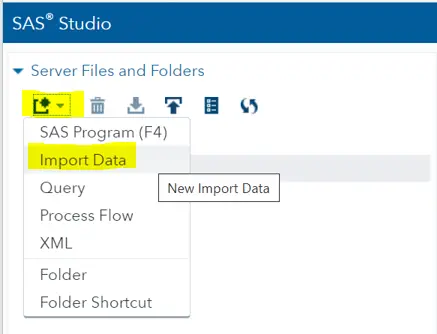
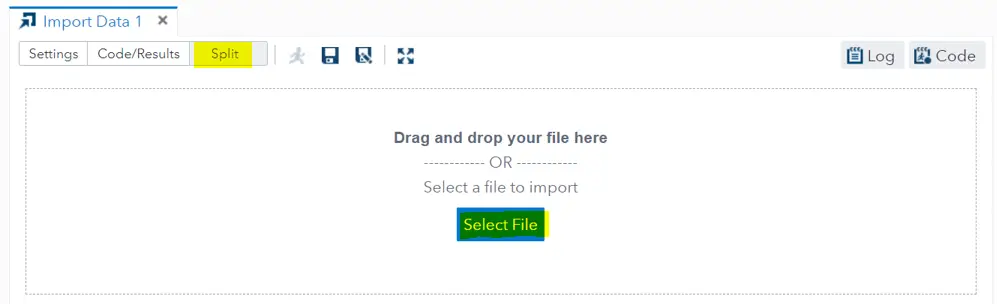
1. Open the Import Wizard
Under the Server Files and Folders tab select the Import Data option. This will open the Import Wizard.
2. Select the File you want to import
Select the file you want to import. You can drag-and-drop your file or browse it.
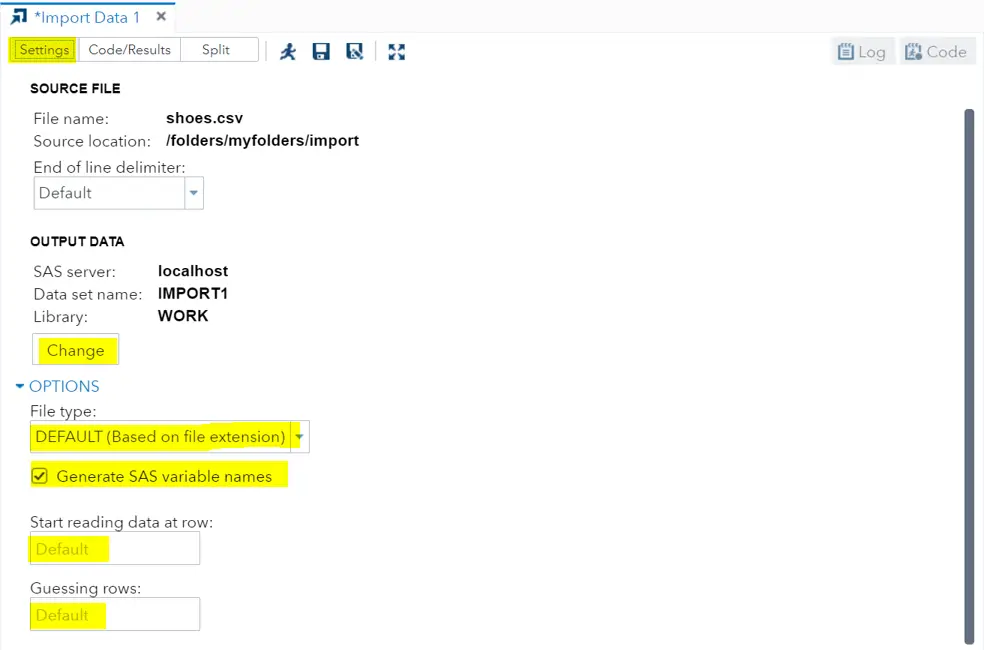
3. Specify the Import Settings
In the Settings tab you can specify several settings.
Firstly, you can specify the name and location (library) of the output dataset.
Secondly, you can define the file type you want to import. By default, SAS guesses the file type based on the file extension. Note: If you want to import a CSV file that isn’t separated by a comma, then you need to change the File Type to DLM and specify the delimiter.
Thirdly, you can tell SAS if your file has a header or not. By default, SAS assumes the file has. If not, uncheck the Generate SAS variable names option.
Finally, you can define the first row that contains data and the number of rows SAS needs to read to guess the data type of each variable. By default, SAS reads 20 rows.
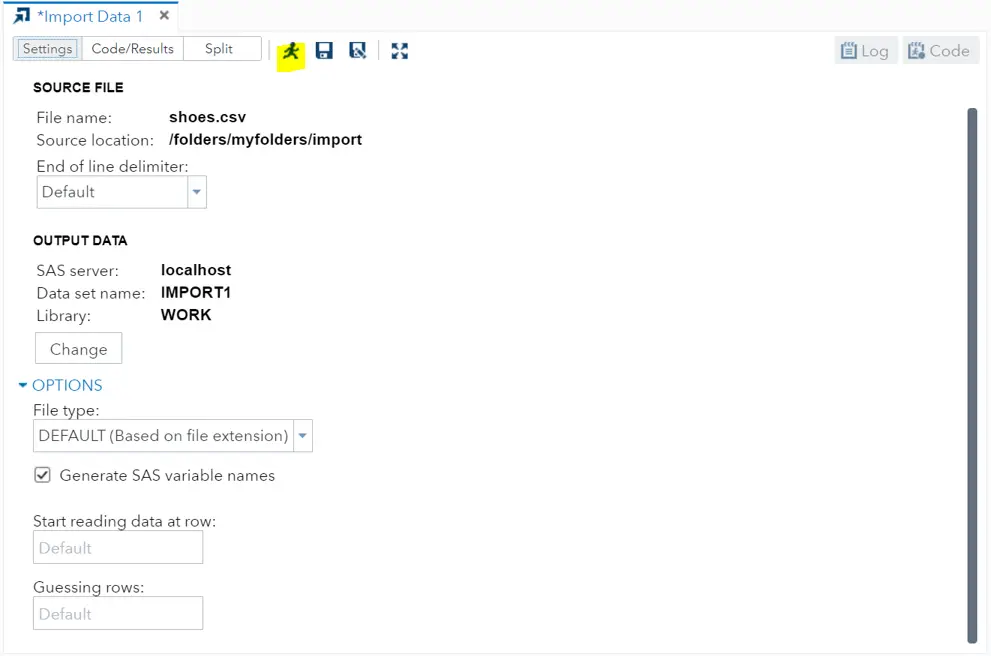
4. Run the Import Wizard
Execute the Import Wizard.
5. Check the Output
The last step is to check the output.
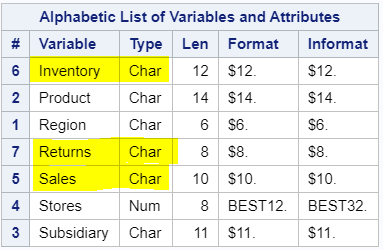
As you can see in the table below, SAS misinterpreted the type of some columns. In fact, when you use the Import Wizard, SAS generates PROC IMPORT code. As discussed before, this method is less flexible than the DATA Step to import files.


2 thoughts on “3 Ways to Import a CSV File into SAS (Examples!)”
Comments are closed.