As a Data Analyst, it’s common practice to manipulate your data in SAS and export it for further analysis. SAS provides many formats to export data, such as CSV (comma-separated values). But, how do you export your data as a CSV file?
You export SAS data as a CSV file with PROC EXPORT. You provide the EXPORT procedure with the data you want to export and the desired location, and SAS will create the CSV file. PROC EXPORT has options to change the delimiter, print column labels instead of column variables, and remove the header.
See also – How to Export Data from SAS to Excel
Contents
Sample Data
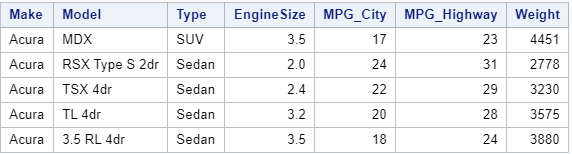
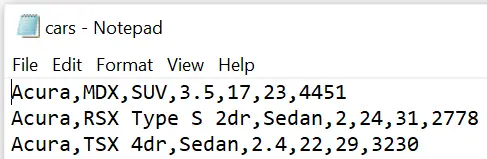
In this article, we use a sample dataset to create a CSV file (work.my_data). This dataset is based on the CARS dataset from the SASHELP library, but with fewer columns.
Do You Know? – How to Select Columns with the KEEP option
Export data from SAS as CSV with PROC EXPORT
The EXPORT Procedure
The easiest way to export data from SAS as CSV is with PROC EXPORT. The EXPORT procedure is a flexible procedure that can be used to export data in many formats such as Excel (.xlsx), Text (.txt), and Comma Separated Values format (.csv). It also provides options to export data with different delimiters, without a header, or export variable labels instead of variable names.
Syntax of PROC EXPORT
To export data from SAS as a CSV file with PROC EXPORT you need to define at least three parameters:
- DATA=-option to specify the SAS dataset you want to export. For example, DATA=work.my_data.
- OUTFILE=-option to define the output location and the file name. For instance, OUTFILE=”/folders/myfolders/export/cars.csv”
- DBMS=-option to specify the file extension such as DBMS=csv.
DATA=-option
The DATA=-option specifies the SAS dataset you want to export. You can either use a one- or two-level SAS name (i.e., with or without libref). When you export a dataset as a CSV file, you can use dataset options such as KEEP, RENAME, and WHERE in the DATA=-option.
OUTFILE=-option
The OUTFILE=-option specifies the location and file name of the exported dataset. The file name includes the extension. Keep in mind that the complete path (location and file name) can’t exceed 201 characters.
DBMS=-option
The DBMS=-option specifies the type of file the EXPORT procedure creates (e.g., .csv). If you create a .csv file and want to open it with Microsoft Excel, keep in mind the maximum number of rows and columns. Excel can only open files that don’t exceed the maximum of 1,048,576 rows and 16,384 columns.
Examples
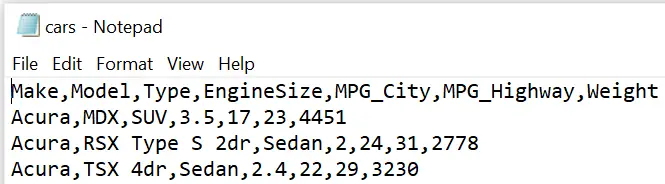
The SAS code below exports the work.my_data dataset as a CSV file and creates a file called cars.csv.
proc export data=work.my_data
    outfile="/folders/myfolders/export/cars.csv"
    dbms=csv;
run;

How to Replace an Existing CSV File
If want to update a previously created CSV file with the EXPORT procedure, then, by default, SAS won’t allow this. The EXPORT procedure protects the existing file and doesn’t permit you to replace it. However, you can change this default behavior. So, how do you overwrite an existing CSV file with PROC EXPORT?
You use the REPLACE option to substitute an existing file with PROC EXPORT. The REPLACE option is part of the EXPORT statement and needs to be placed after the DBMS=-option.
In the example below, we replace the cars.csv file.
proc export data=work.my_data
    outfile="/folders/myfolders/export/cars.csv"
    dbms=csv
    replace;
run;
Keep in mind that SAS won’t ask for confirmation to replace the existing file.
Do you know? How to Create a ZIP File of CSV Files in SAS
How to Change the Delimiter of the CSV File
As the name suggests, the data in CSV files are separated with a comma. However, for some purposes, it is necessary to change the default separator (i.e., delimiter). So, how do you change to delimiter of SAS’ PROC EXPORT?
You use the DELIMITER=-statement to change the default separator of PROC EXPORT. The DLM=-statement is a synonym of the DELIMITER=-statement and can be used instead. The new delimiter must be placed between quotation marks. Typical delimiters are the semicolon, the forward-slash, or the tab.
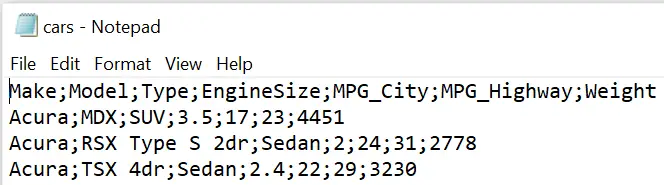
The SAS code below we set the delimiter to the semicolon.
proc export data=work.my_data
    outfile="/folders/myfolders/export/cars.csv"
    dbms=csv
    replace;
    delimiter=";";
run;
Note: To export SAS data as a tab delimited CSV file you have two options
- Set the DELIMITER=-statement to delimiter=”09″x, or
- Set the DBMS=-option to dbms=tab and omit the DELIMITER=-statement.
How to Exclude the Header from the CSV File
Usually, you need the header (i.e., column names) in your output file. That is why SAS includes by default the header in all types of exported files. However, sometimes you might need to change this default setting. So, how do you exclude the header from the CSV file?
The PUTNAMES=-statement allows you to exclude the header from the CSV file. This statement has two options, namely Yes (default) and No. So, to omit the column names, you use PUTNAMES=NO.
In the example below, we create a CSV file without header.
proc export data=work.my_data
    outfile="/folders/myfolders/export/cars.csv"
    dbms=csv
    replace;
    putnames=NO;
run;
How to Export Variable Labels in a CSV File
SAS datasets have variable names and, optionally, variable labels. Variable labels can contain special characters such as blanks and percentage signs. For this reason, variable labels are more elegant and are frequently used in reports. However, by default, PROC EXPORT exports the variable names instead of the variable labels. So, how do you export the variable labels with PROC EXPORT?
You use the LABEL option to create a CSV file with the variable labels instead of the variable names. You place this option after the REPLACE option. If a variable doesn’t have a label, then PROC EXPORT exports the variable name.
For example, with the SAS code below we export the variable labels.
proc export data=work.my_data
    outfile="/folders/myfolders/export/cars.csv"
    dbms=csv
    label
    replace;
run;

With a PROC CONTENTS statement, you can check whether a column has a label. For instance, some of the columns of our sample data work.my_data have labels.
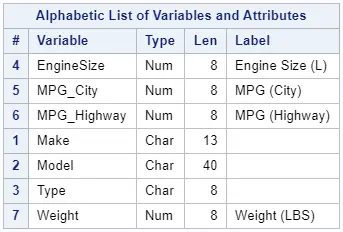
proc contents data=work.my_data;
run;
How to Change to Encoding to UTF-8
There exist many file encodings. The default encoding is (normally) ANSI. However, you can change the default setting such that you can export a CSV file a UTF-8.
You define the encoding of your CSV file with the global FILENAME statement before the PROC EXPORT. The FILENAME statement starts with the FILENAME keyword, followed by the fileref, the file location (including the filename and extension), and the ENCODING=-option. You use ENCODING=”UTF-8″ to export the CSV file with the UTF-8 encoding.
For example:
filename output "/folders/myfolders/export/cars.csv" encoding="UTF-8";

proc export data=work.my_data
    outfile=output
    dbms=csv
    replace;
run;
Note: Instead of defining the location of your file with the OUTFILE=-option, you use the fileref from the FILENAME statement as value for the OUTFILE=-option.
Do you know? 3 Ways to Import a CSV File


4 thoughts on “How to Export SAS Data as a CSV File”
Comments are closed.